 by
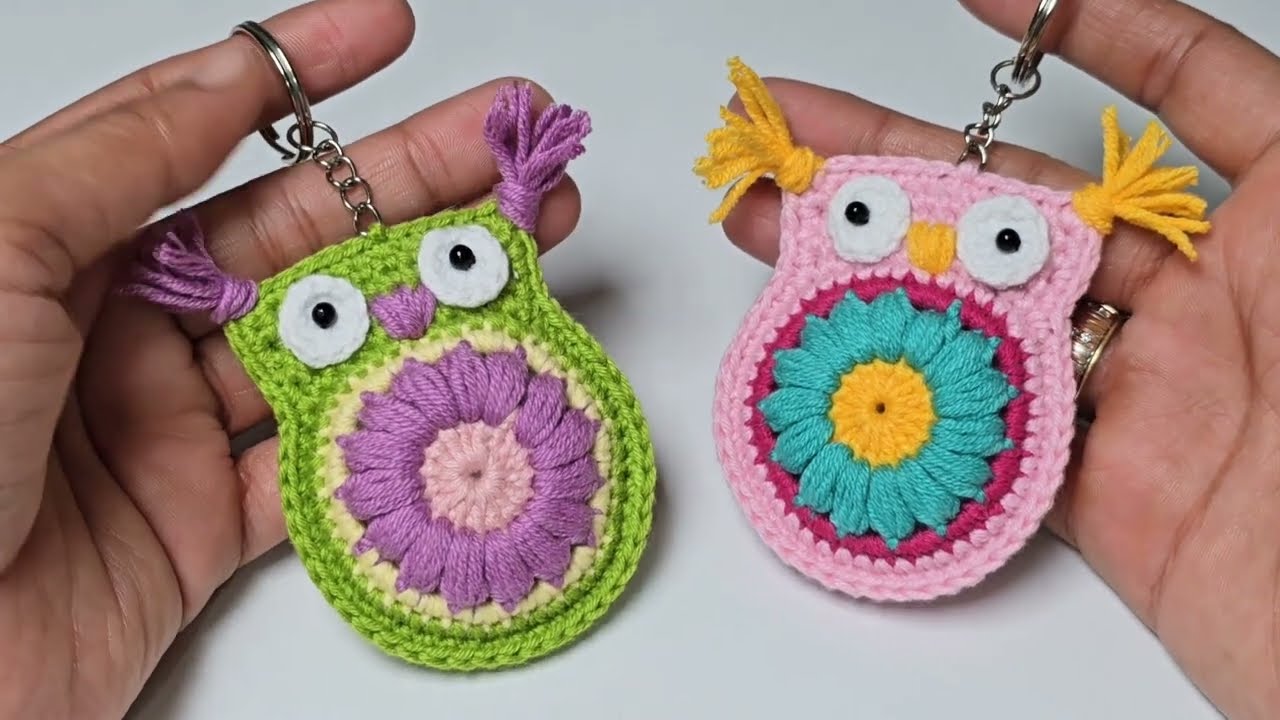
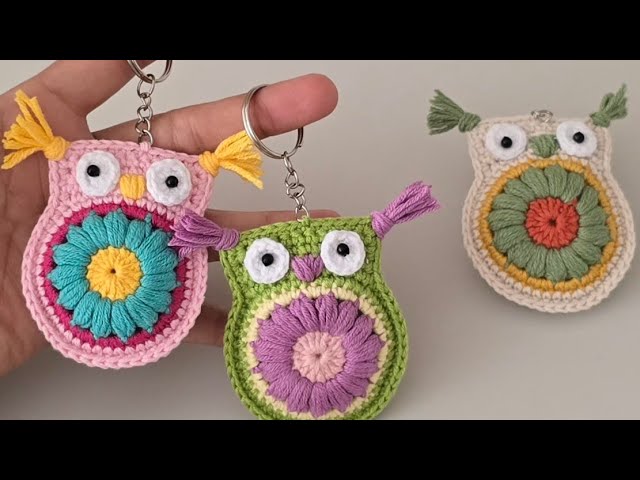
by Who’s ready for an adorable crochet adventure? Whether you’re a beginner looking for a fun and achievable project, or an experienced crafter seeking a quick gift idea, this charming little owl keychain is perfect for you! These cute companions are not only delightful to make but also make fantastic presents for friends and family, or even a lovely item to sell at craft fairs. Grab your hook and let’s bring these wise little owls to life!

Materials You’ll Need
To create your very own owl keychain, gather the following supplies:
- Yarn:
- Main Body Colors: The tutorial uses 5-ply, 50% acrylic, 50% cotton medium thickness threads. You’ll need at least three different colors for the body to achieve the layered look (e.g., Color A for the base, Color B for puff stitches, Color C for the final body layers).
- Eye Color: A small amount of white or light-colored yarn for the eyes.
- Nose Color: A tiny bit of yarn for embroidering the nose (any color you like!).
- Crochet Hook: A 2.20 mm crochet hook is recommended for this project to achieve a compact and sturdy keychain.
- Fiber Filling: A small amount of polyester fiberfill or similar stuffing to give your owl its plump shape.
- Keychain Clip/Ring: A metal keychain clip or ring to attach your finished owl.
- Scissors: For cutting yarn.
- Yarn Needle (Tapestry Needle): For weaving in ends and embroidering the nose.
- Black Pearls or Amigurumi Googly Eyes (Optional): For the center of the eyes, if you’re not crocheting them entirely.
- Fabric Glue (Optional): If using separate eyes.

Let’s Get Crocheting! Step-by-Step Instructions
This pattern will guide you through creating a charming multi-colored owl. Get ready to master magic rings, puff stitches, and some clever joining techniques!
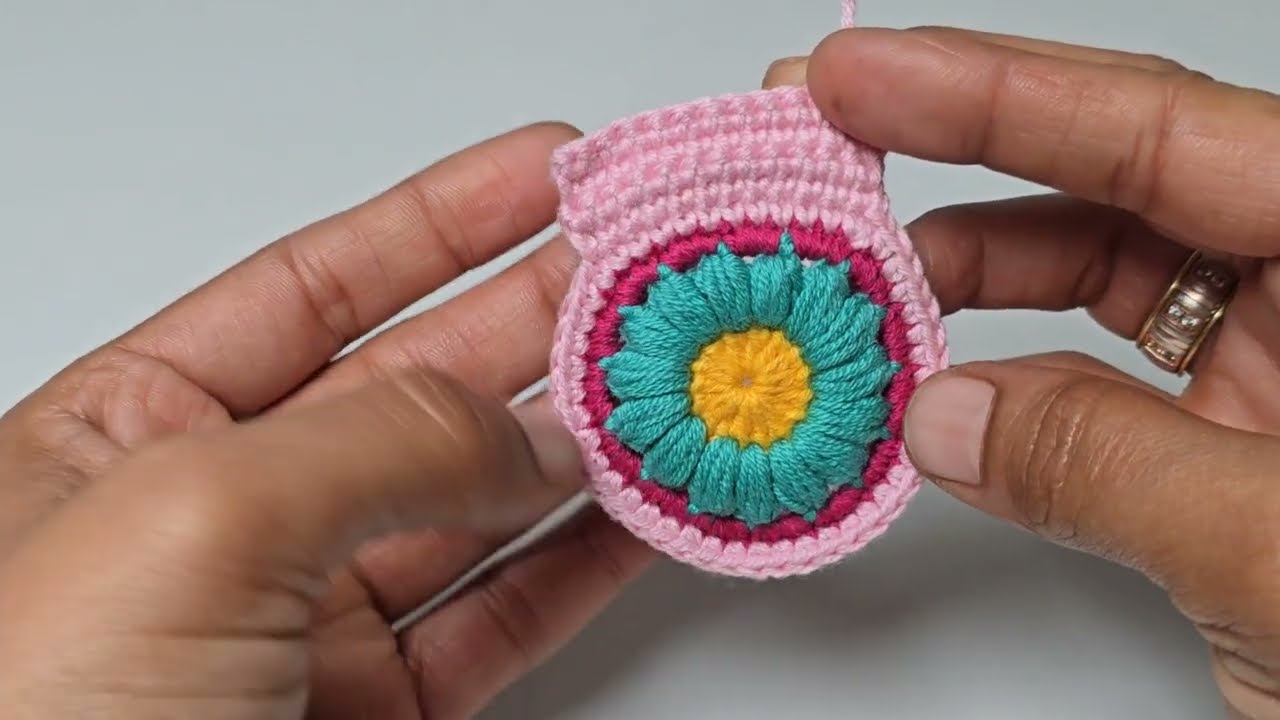
Step 1: The Owl’s Base (Color A)
- Magic Ring: Start by making a magic ring (also known as a magic circle or adjustable ring).
- Row 1: Chain 2 (counts as first DC), then work 15 double crochets (DC) into the magic ring. Join with a slip stitch to the top of the initial chain 2. (Total: 16 stitches including the chain 2). This forms the initial round of your owl.
Step 2: Adding the Puff Stitches (Color B)
- Switch Colors: Attach your second color (Color B).
- Row 2 (Puff Stitches): Chain 2. In each stitch from the previous row, create a puff stitch. A puff stitch typically involves yarn over, insert hook, pull up a loop several times into the same stitch, then yarn over and pull through all loops on hook. Complete 15 puff stitches around. Join with a slip stitch. This row will give your owl its unique textured “feathers.”
Step 3: Defining the Body (Color C)
- Switch Colors: Attach your third color (Color C).
- Row 3 (Alternating Single Crochets): This row shapes the body. You’ll alternate between making single crochets (SC) on the top of each puff stitch from the previous row and in the chain spaces (or gaps) between the puff stitches. This creates a neat transition and helps define the body shape. Continue around and join with a slip stitch.


Step 4: Building the Owl’s Body (Color C – Continued)
- Row 4 (Single Crochets): Continue with Color C. Work single crochets (SC) in all loops around. This creates the main solid part of the owl’s body. Join with a slip stitch.
Step 5: Crocheting the Owl’s Head (Color C – Continued)
- Head Rows: Continue with Color C. Make four rows of 12 single crochets each. This section will form the distinct head part of your owl. Do not join at the end of each of these rows if you are working in continuous rounds, or join and chain 1 if working in joined rounds. You will need two identical pieces (two “halves” of the owl).
Step 6: Assembling the Owl (Joining Pieces)
- Join Two Halves: Take your two crocheted owl pieces (the two halves you just made). Overlap them perfectly.
- Single Crochet Together: Using single crochets, work around the edges, joining the two pieces together. Start from one side of the head and work your way down the body.
Step 7: Stuffing the Owl
- Stuffing Gap: As you crochet around the edges to join the pieces, leave a small gap (about 1-2 inches wide) before fully closing the owl.
- Add Fiber Filling: Through this gap, carefully add fiber filling to your owl until it’s plump and firm, but not overstuffed.
- Close the Gap: Continue crocheting single crochets to close the remaining gap, completing the joining of the two pieces. Finish with a hidden join for a seamless look.
Step 8: Attaching the Keychain Clip
- Keychain Loop: At the top center of the owl’s head, you can either crochet a small loop of chains (e.g., Chain 10-15 and slip stitch back to the starting point) or simply attach the keychain clip directly into the top stitches with a sturdy hidden join.

Step 9: Creating the Owl’s Eyes
The eyes give your owl its personality!
- Crocheted Eyes (Option 1): Make two small circles for the eyes. The video suggests 10 half double crochets (HDC) in a magic ring for each eye using your white/light yarn.
- Attach Pearls/Googly Eyes (Option 2): If you’re using separate black pearls or amigurumi googly eyes, glue them to the center of your crocheted eyes, or directly onto the owl’s face if you skip the crocheted base for the eyes.
Step 10: Adding the Owl’s Ears (Tassels)
- Yarn Tassels: For the ears, cut several strands of yarn (matching your main head color) about 3-4 inches long.
- Attach Tassels: Fold the strands in half, insert your hook into a stitch at the top corners of the owl’s head, loop the folded yarn through, and pull the ends through the loop to create a small tassel. Trim to your desired ear length. Repeat for the other ear.
Step 11: Embroidering the Nose
- Yarn Needle & Nose Color: Thread your yarn needle with a small piece of your chosen nose color yarn.
- Embroider: Create a small V-shape or a small triangle shape for the nose on the owl’s face, centered below the eyes. Knot and weave in ends at the back.
Your Adorable Owl Keychain is Complete!
Hoot, hoot! You’ve successfully crocheted an adorable owl keychain! These little guys are fantastic for personalizing your keys, backpacks, or as thoughtful handmade gifts. Don’t forget to share your creations!
Watch tutorial: