 by
by Sure! Here’s a detailed, beginner-friendly guide on how to make a very easy crochet baby cardigan, along with a simple crochet knitting pattern that you can follow. This will be a top-down, seamless baby cardigan, suitable for babies aged 0–3 months. I’ll walk you through each step.
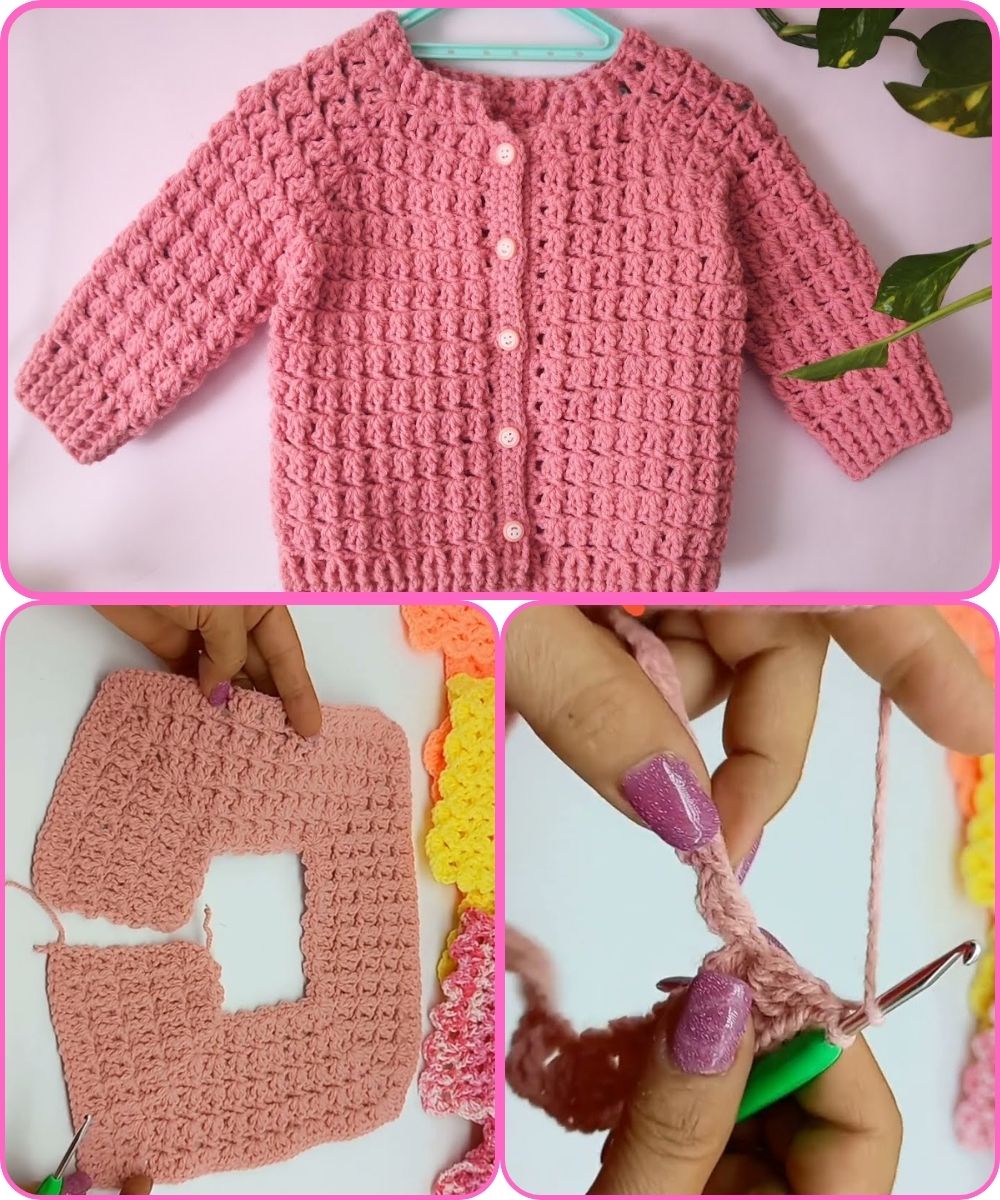
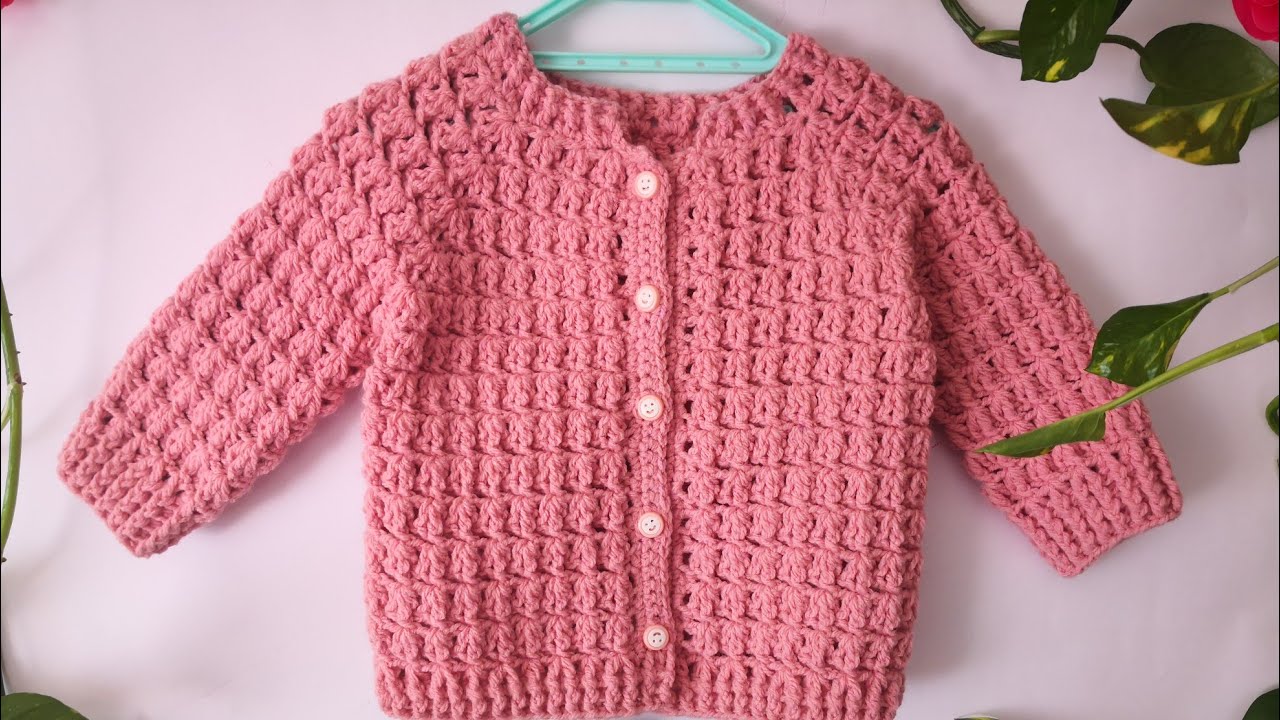
How to Make a Very Easy Crochet Baby Cardigan
(With Crochet Knitting Pattern for 0–3 Months)
Materials Needed:
-
Yarn: Soft baby yarn (DK/Light worsted, weight #3), approx. 150g
-
Hook: 4.0 mm (G-6)
-
Buttons: 3–5 small buttons
-
Tapestry needle: For weaving in ends
-
Scissors
-
Stitch markers (optional)
Abbreviations (US Terms):
| Abbreviation | Meaning |
|---|---|
| ch | chain |
| sc | single crochet |
| dc | double crochet |
| sl st | slip stitch |
| st(s) | stitch(es) |
| inc | increase (2 dc in same st) |
Size:
-
This pattern fits a baby aged 0–3 months
-
Chest circumference: ~16–17 inches (40–43 cm)
-
Length: ~9 inches (23 cm)
Construction:
This cardigan is worked top-down in one piece using double crochet stitches. No seaming required.
Pattern Instructions:
1️⃣ Yoke (Top of the Cardigan)
Start with foundation chain:
Ch 52
Row 1 (Setup row):
-
Dc in 4th ch from hook and each ch across. (Total: 50 dc)
-
Turn.
Row 2 (Mark raglan points):
We now divide for raglan increases.
-
Ch 2 (counts as dc), dc in next 6 sts,
-
(dc, ch 1, dc) in next st → Place stitch marker here (1st raglan)
-
Dc in next 8 sts,
-
(dc, ch 1, dc) in next st → Place marker (2nd raglan)
-
Dc in next 14 sts,
-
(dc, ch 1, dc) in next st → Place marker (3rd raglan)
-
Dc in next 8 sts,
-
(dc, ch 1, dc) in next st → Place marker (4th raglan)
-
Dc in last 7 sts, turn.
Rows 3–9 (Increase Rows):
-
Ch 2, dc in each dc across, placing (dc, ch 1, dc) in each ch-1 space from previous row (raglan points).
-
Remember to move your stitch markers to the new ch-1 space each row.
After Row 9, you should have increased to about 98–106 stitches total.
2️⃣ Separate Sleeves from Body:
Row 10:
-
Dc across to first raglan point,
-
Dc in ch-1 space,
-
Skip all sleeve stitches, and ch 6 (creates underarm),
-
Dc in next raglan point,
-
Dc across back section,
-
Dc in raglan,
-
Skip sleeve stitches, ch 6 again,
-
Dc in last raglan point and finish dc across front.
-
Turn.
Now you are only working the body, sleeves will be done later.
3️⃣ Body (Work Even):
Rows 11–18:
-
Ch 2, dc in each dc and ch st across.
-
Turn at end of each row.
Continue until body measures about 6–7 inches from neckline or your desired length.
Optional: Add 1–2 rows of sc at bottom for a neater finish.
4️⃣ Sleeves:
Join yarn in the underarm chain space of one sleeve.
Round 1:
-
Work dc evenly around the sleeve (about 26–28 dc),
-
Join with sl st.
Rounds 2–7 (or desired length):
-
Ch 2, dc around, sl st to join.
-
Optional: Decrease 1–2 stitches every couple rounds for a taper.
End with a round of sc if desired.
Repeat for second sleeve.

5️⃣ Button Band and Neckline:
Front Edge (button band):
-
Join yarn at bottom of front edge.
-
Work 2 sc in each dc row up to neckline, across neck, then down opposite side.
Buttonholes (optional):
-
On one side (typically right for girls, left for boys), make buttonholes every ~1.5 inches:
-
Use: sc, ch 1 (skip 1), sc – for small buttonholes.
-
Repeat sc row for reinforcement if needed.
6️⃣ Finishing:
-
Sew buttons onto opposite side.
-
Weave in all ends.
-
Block lightly with steam or water to shape if desired.
✅ Tips for Success:
-
Always count your stitches to keep the shape correct.
-
Use stitch markers at raglan points to avoid mistakes.
-
Try the cardigan on a doll or lay flat to check fit as you go.
Customization Ideas:
-
Add stripes or contrast colors.
-
Add a hood (just work sc or dc rows from neck edge).
-
Add ruffles or edging for a decorative touch.
Watch tutorial: