by
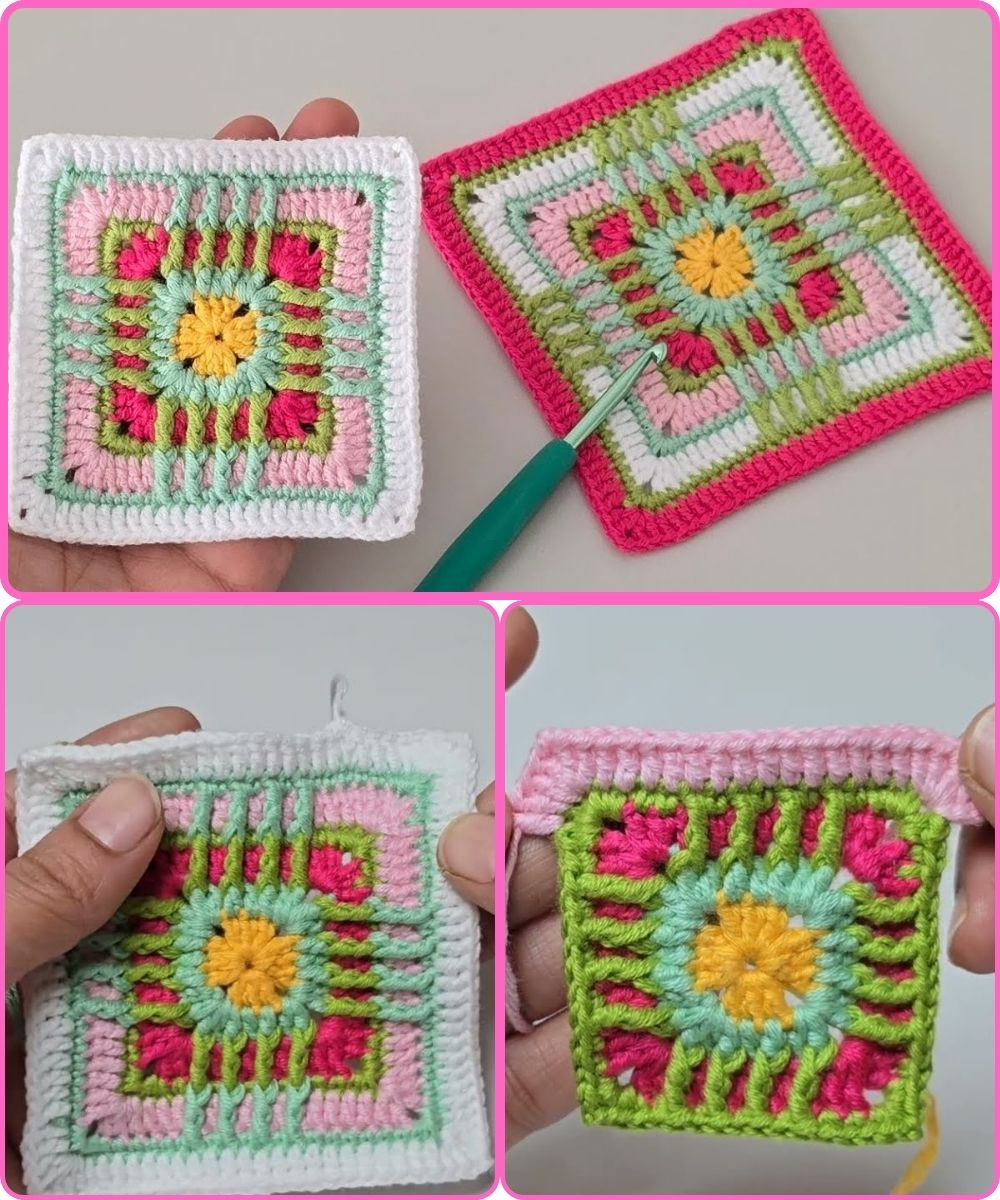
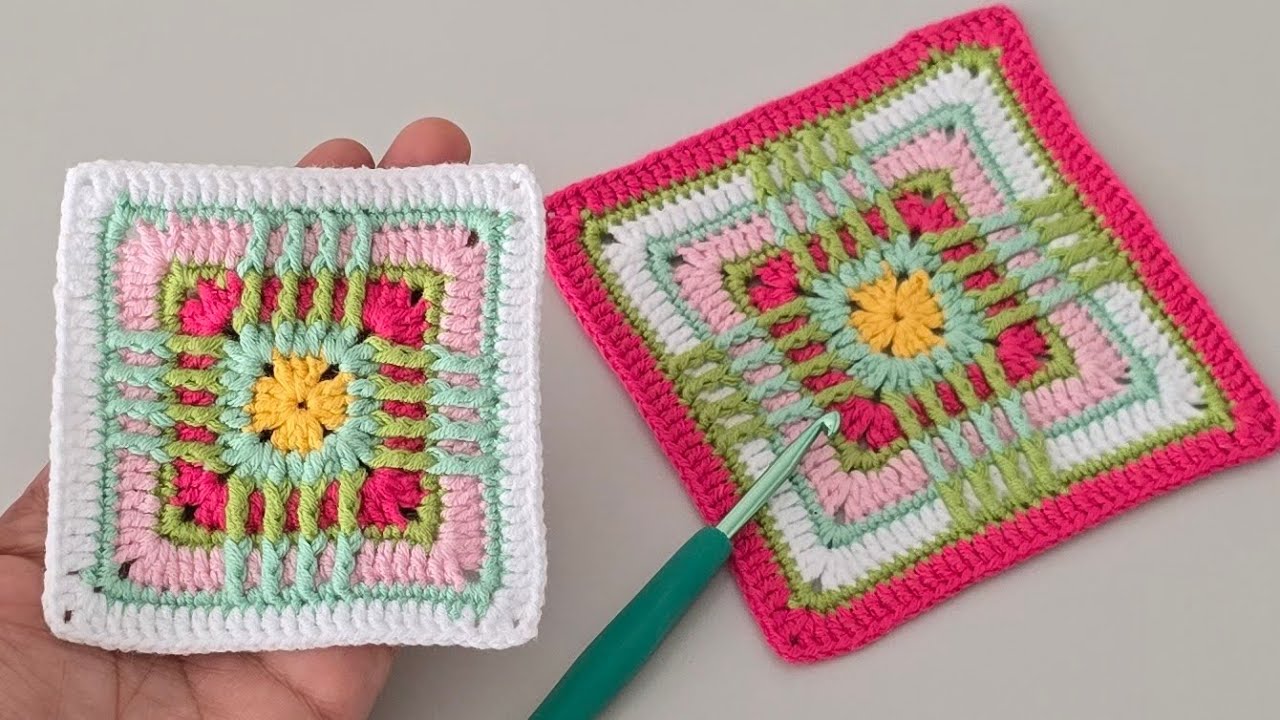
by Ready to add a touch of intricate beauty to your next crochet project? This mosaic patterned square motif is a true showstopper, perfect for blankets, bedspreads, tablecloths, bags, or anything else you can imagine! While it looks complex, this detailed tutorial breaks down each row, making it achievable for enthusiastic crocheters.
Your Artistic Palette: Materials You’ll Need
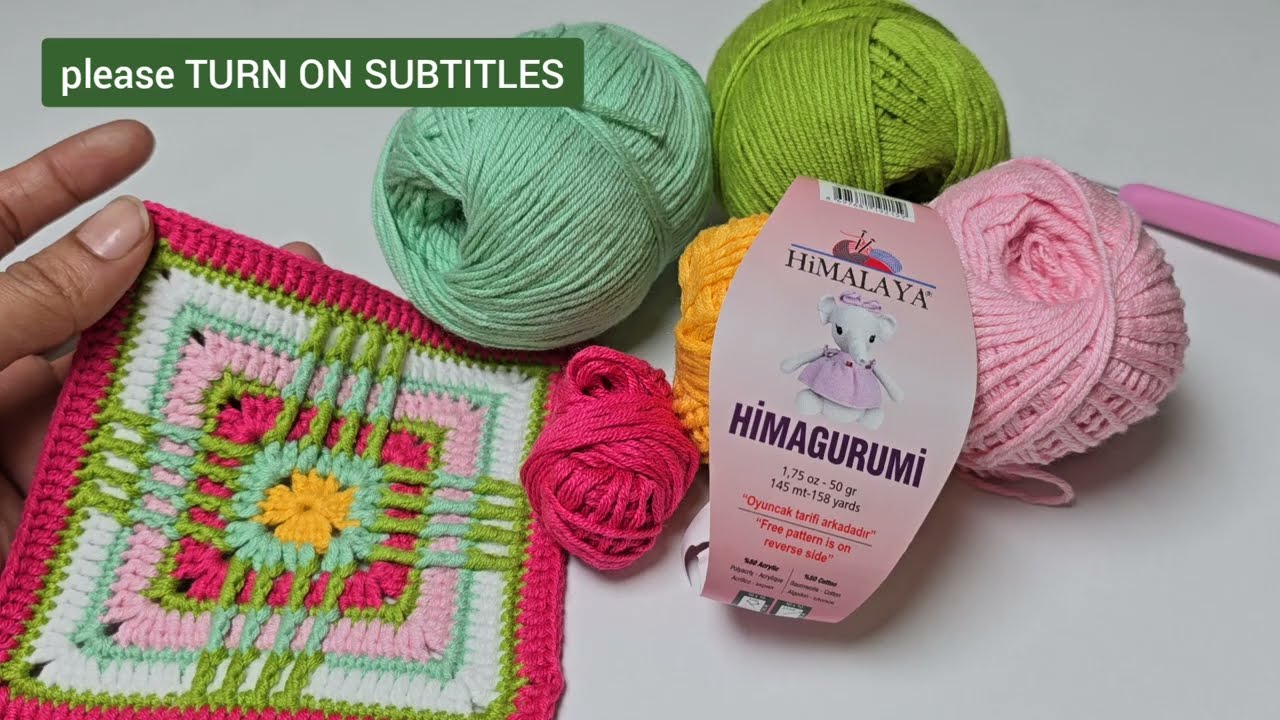
To bring this vibrant mosaic square to life, gather your supplies:
- Yarn: Himalaya Himagurumi cotton yarns are recommended, but any similar weight cotton yarn will work beautifully. You’ll need at least three contrasting colors to achieve the mosaic effect.
- Color A (e.g., White): For the base and some later rows.
- Color B (e.g., Dark Green): For the mosaic “pop” rows.
- Color C (e.g., Light Pink): For additional color rows.
- Color D (e.g., Brown): For the center.
- Crochet Hook: A 2.50 mm crochet hook, or a size appropriate for your chosen yarn to achieve a neat, defined stitch.
- Scissors: For cutting yarn.
- Yarn Needle: For weaving in ends.
Let’s Hook into the Mosaic Magic: Step-by-Step Pattern
This square measures approximately 11.5 cm (about 4.5 inches) wide when finished. You can adjust the size by stopping at an earlier row or repeating later rows.
Important Note: In mosaic crochet, you typically work with one color per row, and the “mosaic” effect is created by dropping stitches down to previous rows. Pay close attention to where you insert your hook!
Row 1: The Foundation (Color D – e.g., Brown)
We begin with the center of our square.
- Magic Ring: Start with a magic ring.
- Round 1: Chain 3 (counts as first double crochet, dc). Work 2 dc into the magic ring.
- *Chain 2, then work 3 dc into the magic ring.* Repeat from * to * three more times (you will have 4 sets of 3 dc separated by ch 2 spaces).
- Chain 2, then join with a slip stitch (sl st) to the top of the initial chain 3. (12 dc, 4 ch-2 spaces)
- Fasten off Color D.
Row 2: First Layer of Color (Color A – e.g., White)
Attach your new color in a corner space.
- Attach Yarn: Fix Color A yarn in any 2-chain space from Row 1.
- Corner: Chain 3 (counts as first dc), 1 dc into the same space, chain 2, 2 dc into the same space. (This creates your first corner).
- Side: Work 3 dc side by side on top of the next 3 dc from Row 1.
- Repeat: *Work (2 dc, ch 2, 2 dc) into the next 2-chain space (corner), then work 3 dc side by side on top of the next 3 dc from Row 1.* Repeat from * to * two more times.
- Join with a sl st to the top of the initial chain 3.
- Fasten off Color A.
Row 3: Adding Another Hue (Color C – e.g., Light Pink)
Time for the next color!
- Attach Yarn: Fix Color C yarn in any corner 2-chain space from Row 2.
- Corner: Chain 3 (counts as first dc), 1 dc into the same space, chain 2, 2 dc into the same space.
- Side: Work 5 dc side by side on top of the next 5 stitches from Row 2.
- Repeat: *Work (2 dc, ch 2, 2 dc) into the next corner 2-chain space, then work 5 dc side by side on top of the next 5 stitches from Row 2.* Repeat from * to * two more times.
- Join with a sl st to the top of the initial chain 3.
- Fasten off Color C.
Row 4: The Mosaic Pop! (Color B – e.g., Dark Green)
This row introduces the triple crochet (tr) for the mosaic effect!
- Attach Yarn: Fix Color B yarn in any corner 2-chain space from Row 3.
- Corner: Work (2 sc, ch 2, 2 sc) into the same space.
- Side: Work 2 sc into the next 2 stitches.
- Mosaic Stitch: Work 1 triple crochet (tr) by lifting a loop from the front of the corresponding stitch in the 2nd row (the white row).
- Continue Side: Work 3 sc into the next 3 stitches.
- Mosaic Stitch: Work 1 tr by lifting a loop from the front of the corresponding stitch in the 2nd row.
- Continue Side: Work 2 sc into the next 2 stitches.
- Repeat: *Work (2 sc, ch 2, 2 sc) into the next corner 2-chain space. Then repeat the side pattern (2 sc, 1 tr from Row 2, 3 sc, 1 tr from Row 2, 2 sc).* Repeat from * to * two more times.
- Join with a sl st to the first sc.
- Fasten off Color B.
Row 5: Building Up (Color C – e.g., Light Pink)
Back to a simpler double crochet row.
- Attach Yarn: Fix Color C yarn in any corner 2-chain space from Row 4.
- Corner: Chain 3 (counts as first dc), 1 dc into the same space, chain 2, 2 dc into the same space.
- Side: Work 9 dc side by side on top of the next 9 stitches from Row 4.
- Repeat: *Work (2 dc, ch 2, 2 dc) into the next corner 2-chain space, then work 9 dc side by side on top of the next 9 stitches from Row 4.* Repeat from * to * two more times.
- Join with a sl st to the top of the initial chain 3.
- Fasten off Color C.
Row 6: Another Mosaic Layer (Color B – e.g., Dark Green)
More mosaic magic! Notice the increase in single crochet stitches between the triple crochets.
- Attach Yarn: Fix Color B yarn in any corner 2-chain space from Row 5.
- Corner: Work (2 sc, ch 2, 2 sc) into the same space.
- Side: Work 4 sc into the next 4 stitches.
- Mosaic Stitch: Work 1 tr by lifting a loop from the front of the corresponding stitch in the 4th row (the previous dark green row).
- Continue Side: Work 5 sc into the next 5 stitches.
- Mosaic Stitch: Work 1 tr by lifting a loop from the front of the corresponding stitch in the 4th row.
- Continue Side: Work 4 sc into the next 4 stitches.
- Repeat: *Work (2 sc, ch 2, 2 sc) into the next corner 2-chain space. Then repeat the side pattern (4 sc, 1 tr from Row 4, 5 sc, 1 tr from Row 4, 4 sc).* Repeat from * to * two more times.
- Join with a sl st to the first sc.
- Fasten off Color B.
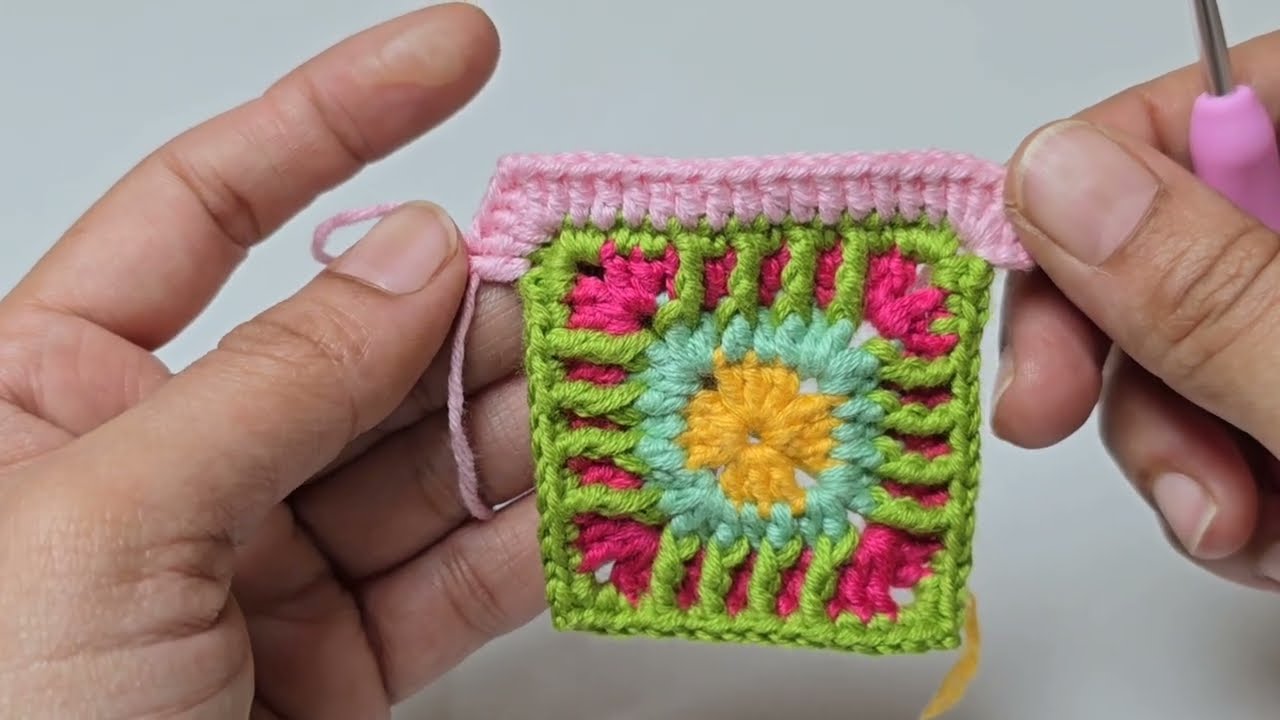
Row 7: Finishing Touches (Color A – e.g., White)
Bringing it all together with a clean finish.
- Attach Yarn: Fix Color A yarn in any corner 2-chain space from Row 6.
- Corner: Chain 3 (counts as first dc), 1 dc into the same space, chain 2, 2 dc into the same space.
- Side: Work 13 dc side by side on top of the next 13 stitches from Row 6.
- Repeat: *Work (2 dc, ch 2, 2 dc) into the next corner 2-chain space, then work 13 dc side by side on top of the next 13 stitches from Row 6.* Repeat from * to * two more times.
- Join with a sl st to the top of the initial chain 3.
- Fasten off Color A.

Row 8: Expanding the Pattern (Color B – e.g., Dark Green)
For a larger square, repeat the mosaic pattern.
- Attach Yarn: Fix Color B yarn in any corner 2-chain space from Row 7.
- Corner: Work (2 sc, ch 2, 2 sc) into the same space.
- Side: Work 6 sc into the next 6 stitches.
- Mosaic Stitch: Work 1 tr by lifting a loop from the front of the corresponding stitch in the 6th row (the previous dark green row).
- Continue Side: Work 7 sc into the next 7 stitches.
- Mosaic Stitch: Work 1 tr by lifting a loop from the front of the corresponding stitch in the 6th row.
- Continue Side: Work 6 sc into the next 6 stitches.
- Repeat: *Work (2 sc, ch 2, 2 sc) into the next corner 2-chain space. Then repeat the side pattern (6 sc, 1 tr from Row 6, 7 sc, 1 tr from Row 6, 6 sc).* Repeat from * to * two more times.
- Join with a sl st to the first sc.
- Fasten off Color B.
Your Mosaic Masterpiece Awaits!
You’ve now created a beautiful mosaic square motif! You can stop after Row 7 for a slightly smaller square, or continue repeating Rows 6 and 7 (alternating colors and adjusting the number of single crochets on the sides) to make an even larger square. These squares are perfect for joining together to create stunning blankets, throws, or even unique garments.
Happy crocheting!
Watch tutorial: